Open trading connections
Open Account, select Settings, then select Trading. Read the providers and status labels shown for the current account before choosing an action. A provider may already be connected, be unconfigured, or require a different authorization path.
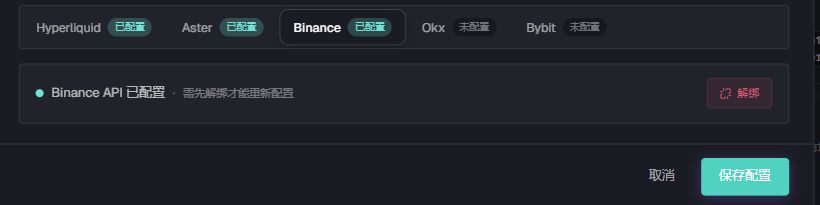
Provider tabs and connected labels show the captured account. Choose a provider and verify the status shown on your page.
Supported connection types
| Type | Examples | Credentials |
|---|---|---|
| Binance authorization | Classic Account | Authorize at Binance, then verify the configured account |
| CEX API | Binance Classic or Unified Account, OKX, Bybit, and other providers shown by the product | API key, Secret, and provider-specific passphrase when required |
| Wallet authorization | Hyperliquid, Aster, and supported wallet-based providers | Wallet connection and message or transaction signature |
Official consoles and help
Sign in to the intended exchange account before opening its console. Use these pages to create, review, or revoke credentials; enter the credentials only in the NewsLiquid trading-connection form.
| Provider | Official console | Official help | Use |
|---|---|---|---|
| Binance | binance.com/en/my/settings/api-management | How to create API keys | Create or revoke a dedicated API key. |
| OKX | okx.com/account/my-api | API FAQ | Create or edit a key and its passphrase, permissions, and IP allowlist. |
| Bybit | bybit.com/app/user/api-management | How to create an API key | Create or revoke a dedicated API key. |
| Hyperliquid | app.hyperliquid.xyz/API | API wallets | Review or revoke API wallets. Complete the NewsLiquid connection from its wallet-authorization panel. |
| Aster | asterdex.com/en/api-management | Agent and builder authorization | Complete the NewsLiquid connection in its wallet-authorization panel. The API console only reviews or revokes related credentials; it is not the NewsLiquid binding entry. |
Binance one-click authorization
If the page reports that an API key already exists, inspect the old key named NewsLiquid in Binance API management and check what uses it. Only delete it when you intend to replace that connection, then authorize again. Deletion invalidates clients using that key; leave unrelated keys intact.
Closing the window or receiving an error does not confirm a successful connection. Read the configured status before continuing, or use the manual flow below.
- 01
Select the account type
In Trading API configuration, choose Binance. Classic Account offers one-click authorization or manual credentials. Unified Account uses manual credentials.
- 02
Open the official authorization window
Select Authorize, sign in at Binance, and check the account and requested permissions. If blocked, allow pop-ups for the current site and retry.
- 03
Wait for the return
After authorization, wait for the window to return to NewsLiquid and for the configured state to refresh. Verify the intended account with read-only account or position data.
Connect a CEX manually
- 01
Create a separate API key at the exchange
Open the official console above and use a key dedicated to NewsLiquid.
- 02
Enable minimum permissions
Start with read access. Add trading only when needed. Never enable withdrawals.
- 03
Set the IP allowlist
Use the address displayed by NewsLiquid when the provider and page require it.
- 04
Read the current provider status
Enter credentials only when the selected provider is unconfigured. If it is already connected, verify it or deliberately disconnect before replacing it.
- 05
Enter and save credentials
Enter the API key, Secret, and passphrase directly in the NewsLiquid form, then select Save.
- 06
Verify the result
Continue only after the page shows success or a configured status; then compare read-only account data with the intended exchange account.
Authorize a wallet-based provider
- 01
Choose the provider
Check network and intended wallet.
- 02
Connect the wallet
Verify the domain and address shown in the wallet.
- 03
Read the request
A login signature differs from token approval, transfer, or trading authorization.
- 04
Sign only after review
Check the exact message or transaction in the wallet, then approve it.
- 05
Verify status
Return to Settings and confirm the connected provider and address label.
Verify or disconnect
Use a read-only account or balance check first.
Check provider, account type, and permissions.
For a failed connection, verify key status, passphrase, IP allowlist, and provider region.
After disconnecting, remove or revoke the API key at the exchange when it is no longer needed.
Protect credentials
Enter API Secrets and passphrases only in the corresponding NewsLiquid configuration form. Before saving, verify the NewsLiquid domain, provider, account environment, and permissions. After saving, use balance, account, or position data to confirm that the intended account is connected.